- Home
- About Us
- Products
- Resin Furniture
- 3D Epoxy Flooring Service
- Resin Table Top
- Wooden Epoxy Resin Table Top
- Metallic Epoxy Flooring Service
- Conception Chemical Consultants
- Chemical Consultancy For Construction
- Construction Chemical Consultant
- Tile Grout
- Foundation Grout Consultant
- Paver Block Chemical Consultant
- Waterproofing Chemical Consultant
- Epoxy Pigment Consultant
- Heat Reflective Coating
- Water Repellent Coating
- Epoxy Grout
- Chemical Consultant
- Industrial Chemical
- Construction Chemical
- Epoxy Resin
- Epoxy Coating
- Polyester Resin
- Joint Sealants
- Cristal Clear Epoxy Resin And Hardner
- Construction Chemicals
- Polycarboxylate Ether And Liquid
- Solvent Cement
- Tile Protection Sheet
- Water Reducing Superplasticizer
- Epoxy Resin And Hardeners
- Two Component Waterproof Coating
- Epoxy Floor Coatings
- Casting Resin
- Sbr Latex Polymer
- Epoxy Grout Formulations
- Epoxy Resin Tabletops
- Tile Spacers
- Tile Levelling Spacers
- Industrial Night Vision Epoxy Grout
- Sbr Latex
- Johnberg Marble Polishing Liquid
- Acrylic Elastomeric Coating
- Weber Tile Adhesives
- Decorative Arts
- Resinic Crafts
- PU Flexible Tile Adhesive
- Resin Pressed Flowers
- Dry Pressed Flower
- Epoxy Putty
- Resin Furniture
- Services
- Updates
- Gallery
- Contact Us
Wooden Epoxy Resin Table Top In Jammu


Details of Wooden Epoxy Resin Table Top
A wooden epoxy resin tabletop combines the natural beauty of wood with the glossy, durable finish of epoxy resin, creating a stunning and functional piece of furniture. Here's a detailed breakdown of the elements and process that go into creating a wooden epoxy resin tabletop:
1. Materials Needed
Wood: Typically hardwoods like walnut, oak, maple, or pine are used. The wood should be thick and solid, with unique grain patterns and features such as knots or cracks that you want to highlight.
Epoxy Resin: A clear, two-part epoxy resin is mixed with a hardener. This resin creates a hard, glass-like finish when it cures. Some resins come with colorants or additives for adding color effects.
Hardener: The epoxy resin needs a hardener to cure and set properly.
Pigments or Dyes (optional): You can add color to the resin for unique designs—this is often used for filling cracks or for creating vibrant accent lines.
Sandpaper: For smoothing out the surface before and after the resin is poured.
Wood Finish (optional): Oil, wax, or polyurethane can be used to finish the wood before applying epoxy, protecting the wood and adding depth to the grain.
Sealant: To protect the resin once it’s poured and fully cured.
2. Steps for Creating a Wooden Epoxy Resin Tabletop
Step 1: Preparation of the Wood
Selecting and Preparing the Wood: Choose a slab of wood with an interesting grain or texture. It could have natural imperfections like cracks, knots, or voids, which are perfect for filling with resin.
Sanding: Sand the surface of the wood to remove any rough spots, and to ensure a smooth, clean surface. Start with a coarse-grit sandpaper (around 80-grit) and gradually move to finer grits (up to 220-grit).
Sealing the Wood: Before applying resin, the wood should be sealed to prevent air bubbles and resin from being absorbed into the wood. You can apply a thin layer of wood sealer or finish.
Step 2: Mixing and Coloring the Epoxy Resin
Mixing the Resin: Follow the manufacturer’s instructions carefully when mixing the epoxy resin and hardener. Typically, the ratio is 1:1 or 2:1, depending on the product.
Adding Color: If you want to add color to your epoxy resin, you can incorporate pigments, dyes, or even metallic powders. Some people create beautiful effects by adding colored resin to cracks or voids in the wood.
Pouring Resin in Layers: Pour the resin onto the wood surface slowly and evenly. You might need to do this in layers, allowing each layer to cure before applying another. This helps avoid excessive heat buildup and prevents the resin from spilling over.
Step 3: Pouring the Epoxy Resin
Pouring Process: Once your resin is mixed and colored (if desired), begin pouring it onto the wood surface. You can use a spatula or a trowel to spread it evenly over the wood, ensuring that all cracks and crevices are filled.
Bubble Removal: Resin can form air bubbles during the mixing and pouring process. You can remove them using a heat gun, torch, or by simply allowing them to rise to the surface and pop.
Leveling: Make sure the resin is level and spread evenly across the surface. This may require adjusting the piece or using a leveling tool.
Step 4: Curing
Allow to Cure: Let the resin cure for at least 24-48 hours (or according to the manufacturer's instructions). Make sure the environment is free of dust and debris during this time.
Check the Thickness: If you are pouring in layers, ensure that each layer is fully cured before adding the next.
Step 5: Sanding and Polishing
Sanding: After the resin has fully cured, sand the surface using progressively finer grits (starting from 220-grit up to 1000 or even 2000-grit). This ensures a smooth surface and removes any imperfections, such as resin drips or excess material.
Polishing: Once you achieve a smooth surface, you can polish it to give it a high-gloss, glass-like finish using polishing compounds or a buffing wheel.
Step 6: Final Wood Treatment
Edge Finishing: If the wood edges need finishing, you can sand them down or apply a decorative treatment like live edges, where the natural shape of the wood is preserved.
Wood Finish: Depending on the look you’re going for, you may want to apply a final coat of wood oil or wax. This enhances the wood grain and gives it additional depth.
Step 7: Installing the Tabletop
Legs and Assembly: You can install your wooden epoxy resin tabletop onto a table frame or base. Metal or wooden legs are commonly used, but you can get creative with the design.
3. Advantages of Wooden Epoxy Resin Tabletops
Aesthetic Appeal: The resin enhances the natural beauty of the wood, especially when filling cracks or creating smooth surfaces over rough wood. It offers a glossy, high-end finish.
Durability: Epoxy resin is very durable, resistant to stains, moisture, and scratches once fully cured.
Customization: You can tailor the design to your liking, adding colors, glitter, or metallic effects to the resin, or choosing specific types of wood for unique grain patterns.
Unique and One-of-a-Kind: Every tabletop is unique, thanks to the irregularities and variations in both the wood and the resin.
Offered Product

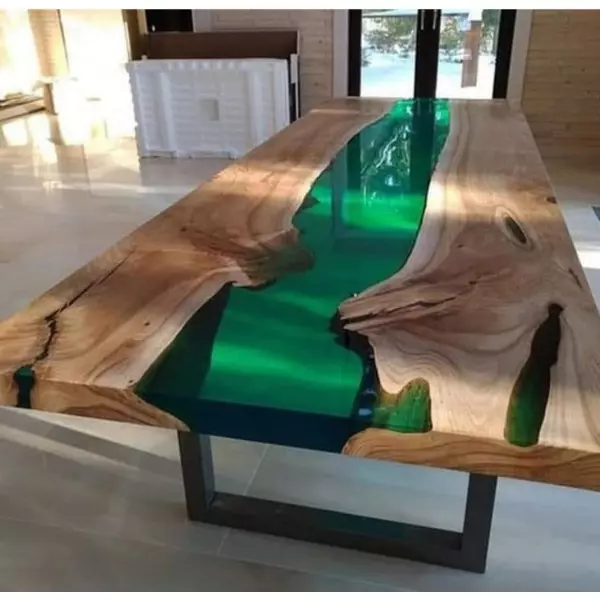
Wooden Epoxy Resin Table Top
Materialepoxy ResinDesign/PatternStandardBrandjohnbergPlace Of OriginIndiaShapecustomiseTypeepoxy TopUsage/ApplicationFurnituretabletop Made With Epoxy Resin Gives Extra Look To Your Home. It Has Good Scratch Resistance. Matt And Glossy Both Look Posible With Our Epoxy System. Good Uv Resistance Charactoristics.Additional Information:Item Code: 3050Production Capacity: 1000Delivery Time: 7 DaysPackaging Details: Customise... Read moreWooden Epoxy Resin Table Top Wholesalers In Rajasthan

A Wooden Epoxy Resin Tabletop Is A Visually Striking Piece Of Furniture That Combines Natural Wood With Epoxy Resin. These Tables Are Popular For Their Durability, Unique Aesthetics, And Custom Design Possibilities. Here's A Detailed Overview:Key Components1. Wood SlabType: Typically Hardwoods Like Walnut, Oak, Maple, Acacia, Or Teak.Form: Live Edge Slabs (where The Natural Edge Of The Wood Is Preserved) Are Common For A Rustic, Organic Look.Preparation: Dried (kiln Or Air), Planed, An Continue
Wooden Epoxy Resin Table Top In Kochi

A Wood And Epoxy Resin Table Top Combines Natural Wood With A Clear Or Colored Epoxy Resin, Creating A Durable, Unique, And Visually Striking Surface. These Are Often Referred To As "river Tables" Or Resin-inlaid Tables. Here’s A Detailed Overview: Basic StructureMaterial: A Combination Of Hardwood (e.g., Walnut, Oak, Maple, Acacia) And Epoxy Resin.Design Style: Often A Live Edge Slab On Both Sides With Epoxy Resin Poured In Between (river Style), Or Inlays Of Resin Within Crack Continue
Wooden Epoxy Resin Table Top In Aizawl
A Wooden Epoxy Table Top Resin Is A Unique Piece Of Furniture That Combines The Natural Beauty Of Wood With The Sleek, Glossy Finish Of Epoxy Resin. Here Are The Key Details:Material Composition:Wood: Typically, Hardwoods Like Walnut, Oak, Maple, Or Live Edge Wood Slabs Are Used. These Woods Have Interesting Grain Patterns, Colors, And Textures That Give Each Table A Distinctive Look.Epoxy Resin: A Clear, Durable Synthetic Resin That Is Mixed With A Hardener To Form A Solid Surface. It Is Continue